Step 2: To reset them, delete this folder, then restart the WLAN service.
August
22
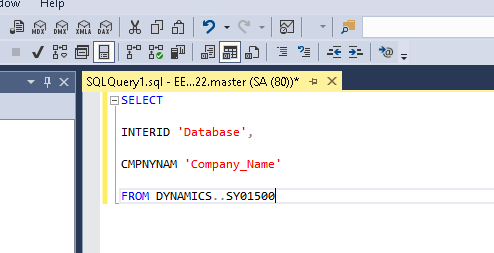
Find AD users Password Expiration Date
Find all users with password never expires
get-aduser -filter * -properties Name, PasswordNeverExpires | where { $_.passwordNeverExpires -eq “true” } | where {$_.enabled -eq “true”}| Format-Table -Property Name, PasswordNeverExpires -AutoSize
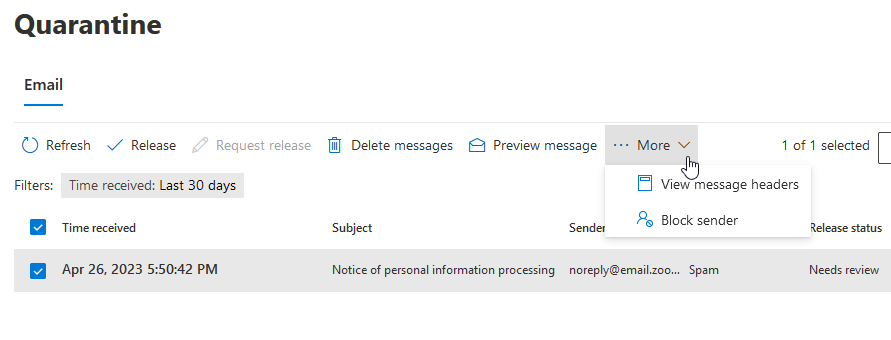
To find Office 365 quarantined emails, follow these steps:
1. sign into https://security.microsoft.com/quarantine.
2. Navigate to Review > Quarantine.
3. Select the email. you can release it if it is legitimate or block the sender if it is not legitimate.
Problem:
trying to find out which switch port a computer is connected to, the wall jack doesn’t have a label to tell the switchport.
Solutions:
Step 1 use command terminal monitor
Step 2 disconnect/reconnect the computer from the network
The output shows the computer is connected to interface g1/0/44
Disconnection:
Mar 9 20:46:53.580 SV: %LINK-3-UPDOWN: Interface GigabitEthernet1/0/44, changed state to down
Mar 9 20:46:54.594 SV: %LINEPROTO-5-UPDOWN: Line protocol on Interface GigabitEthernet1/0/44, changed state to down
Connection:
Mar 9 20:47:02.311 SV: %LINK-3-UPDOWN: Interface GigabitEthernet1/0/44, changed state to up
Mar 9 20:47:03.311 SV: %LINEPROTO-5-UPDOWN: Line protocol on Interface GigabitEthernet1/0/44, changed state to up

![]()
![]()
Note: if the one switch is connected to another switch, we can use show cdp neighbors and show cdp neighbors deail to find out the ip address of the connected switch 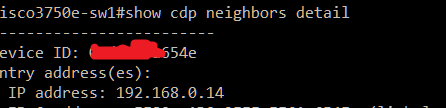 .
.
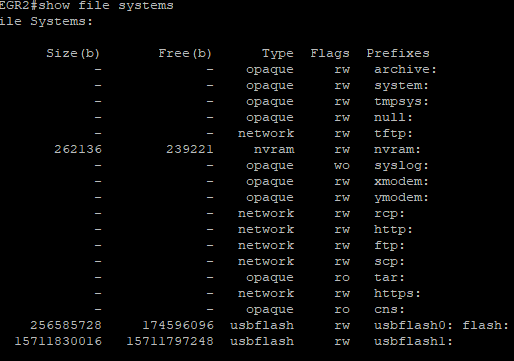
in this case we can see usbflash1 is the external USB drive
(The USB drive might need to be formatted as FAT. Can do it right within the router. Here is the command format usbflash1: ) Please make sure to format the correct USB drive
Backup:
copy run usbflash1:/
Restore:
copy usbflash1:/the-backup-file-name starup-config